Hawaiʻi Grower’s Guide to Upland Kalo

Kalo (or taro outside of Hawaiʻi) is a starchy root vegetable found throughout the tropics and subtropics of the world. It is believed to be one of the world’s most ancient cultivated crops, and it is deeply tied to the history and traditions of Hawaiʻi. While the corm – the starchy root of the plant – is the most commonly consumed part of the kalo, the leaves and stems are also edible when cooked. Kalo is full of good fiber and vitamins, as well as calcium and iron, which perhaps contributed to its central role in the early Hawaiian diet. (Handy et al. 1972; Cho et al. 2007)
Check out this helpful CTAHR infographic (PDF) about the anatomy of kalo!

The History of Kalo in Hawaiʻi
In the moʻolelo of Hawaiʻi, kalo was the first, stillborn son of Wākea and Ho’ohōkūkalani. From his buried body, the first kalo emerged. After this, Ho’ohōkūkalani gave birth to another son, whom they called Hāloa. This second son was the first ancestor of the Hawaiian people, and it is from Hāloa that all Hawaiians descended (Handy et al. 1972). It is important to remember that in the mo’olelo, the kalo comes into existence before the first descendant of humanity; kalo is the big brother to the people of Hawaiʻi, implying a reciprocal relationship between kalo and humankind. This relationship is shown in the rich history of cultivation and care that the Hawaiian people have demonstrated towards kalo, having created an estimated 150 different varieties (accounting for an additional 150 estimated synonym terms) with all manner of different colors, tastes, growth habits and preferences.

Kalo Planting Practices
The old Hawaiian planters knew their older brother well, and they were able to adjust their planting methods based on the unique microclimates, weather patterns, and available resources in any given area. There were methods of elaborate irrigation, co-cropping, fire regimes combined with mulching, and so much more, which you can learn about in the book Native Planters in Old Hawaiʻi. For the sake of streamlining this information, however, we will focus on the primary means of commercial kalo cultivation for most farmers: upland planting.
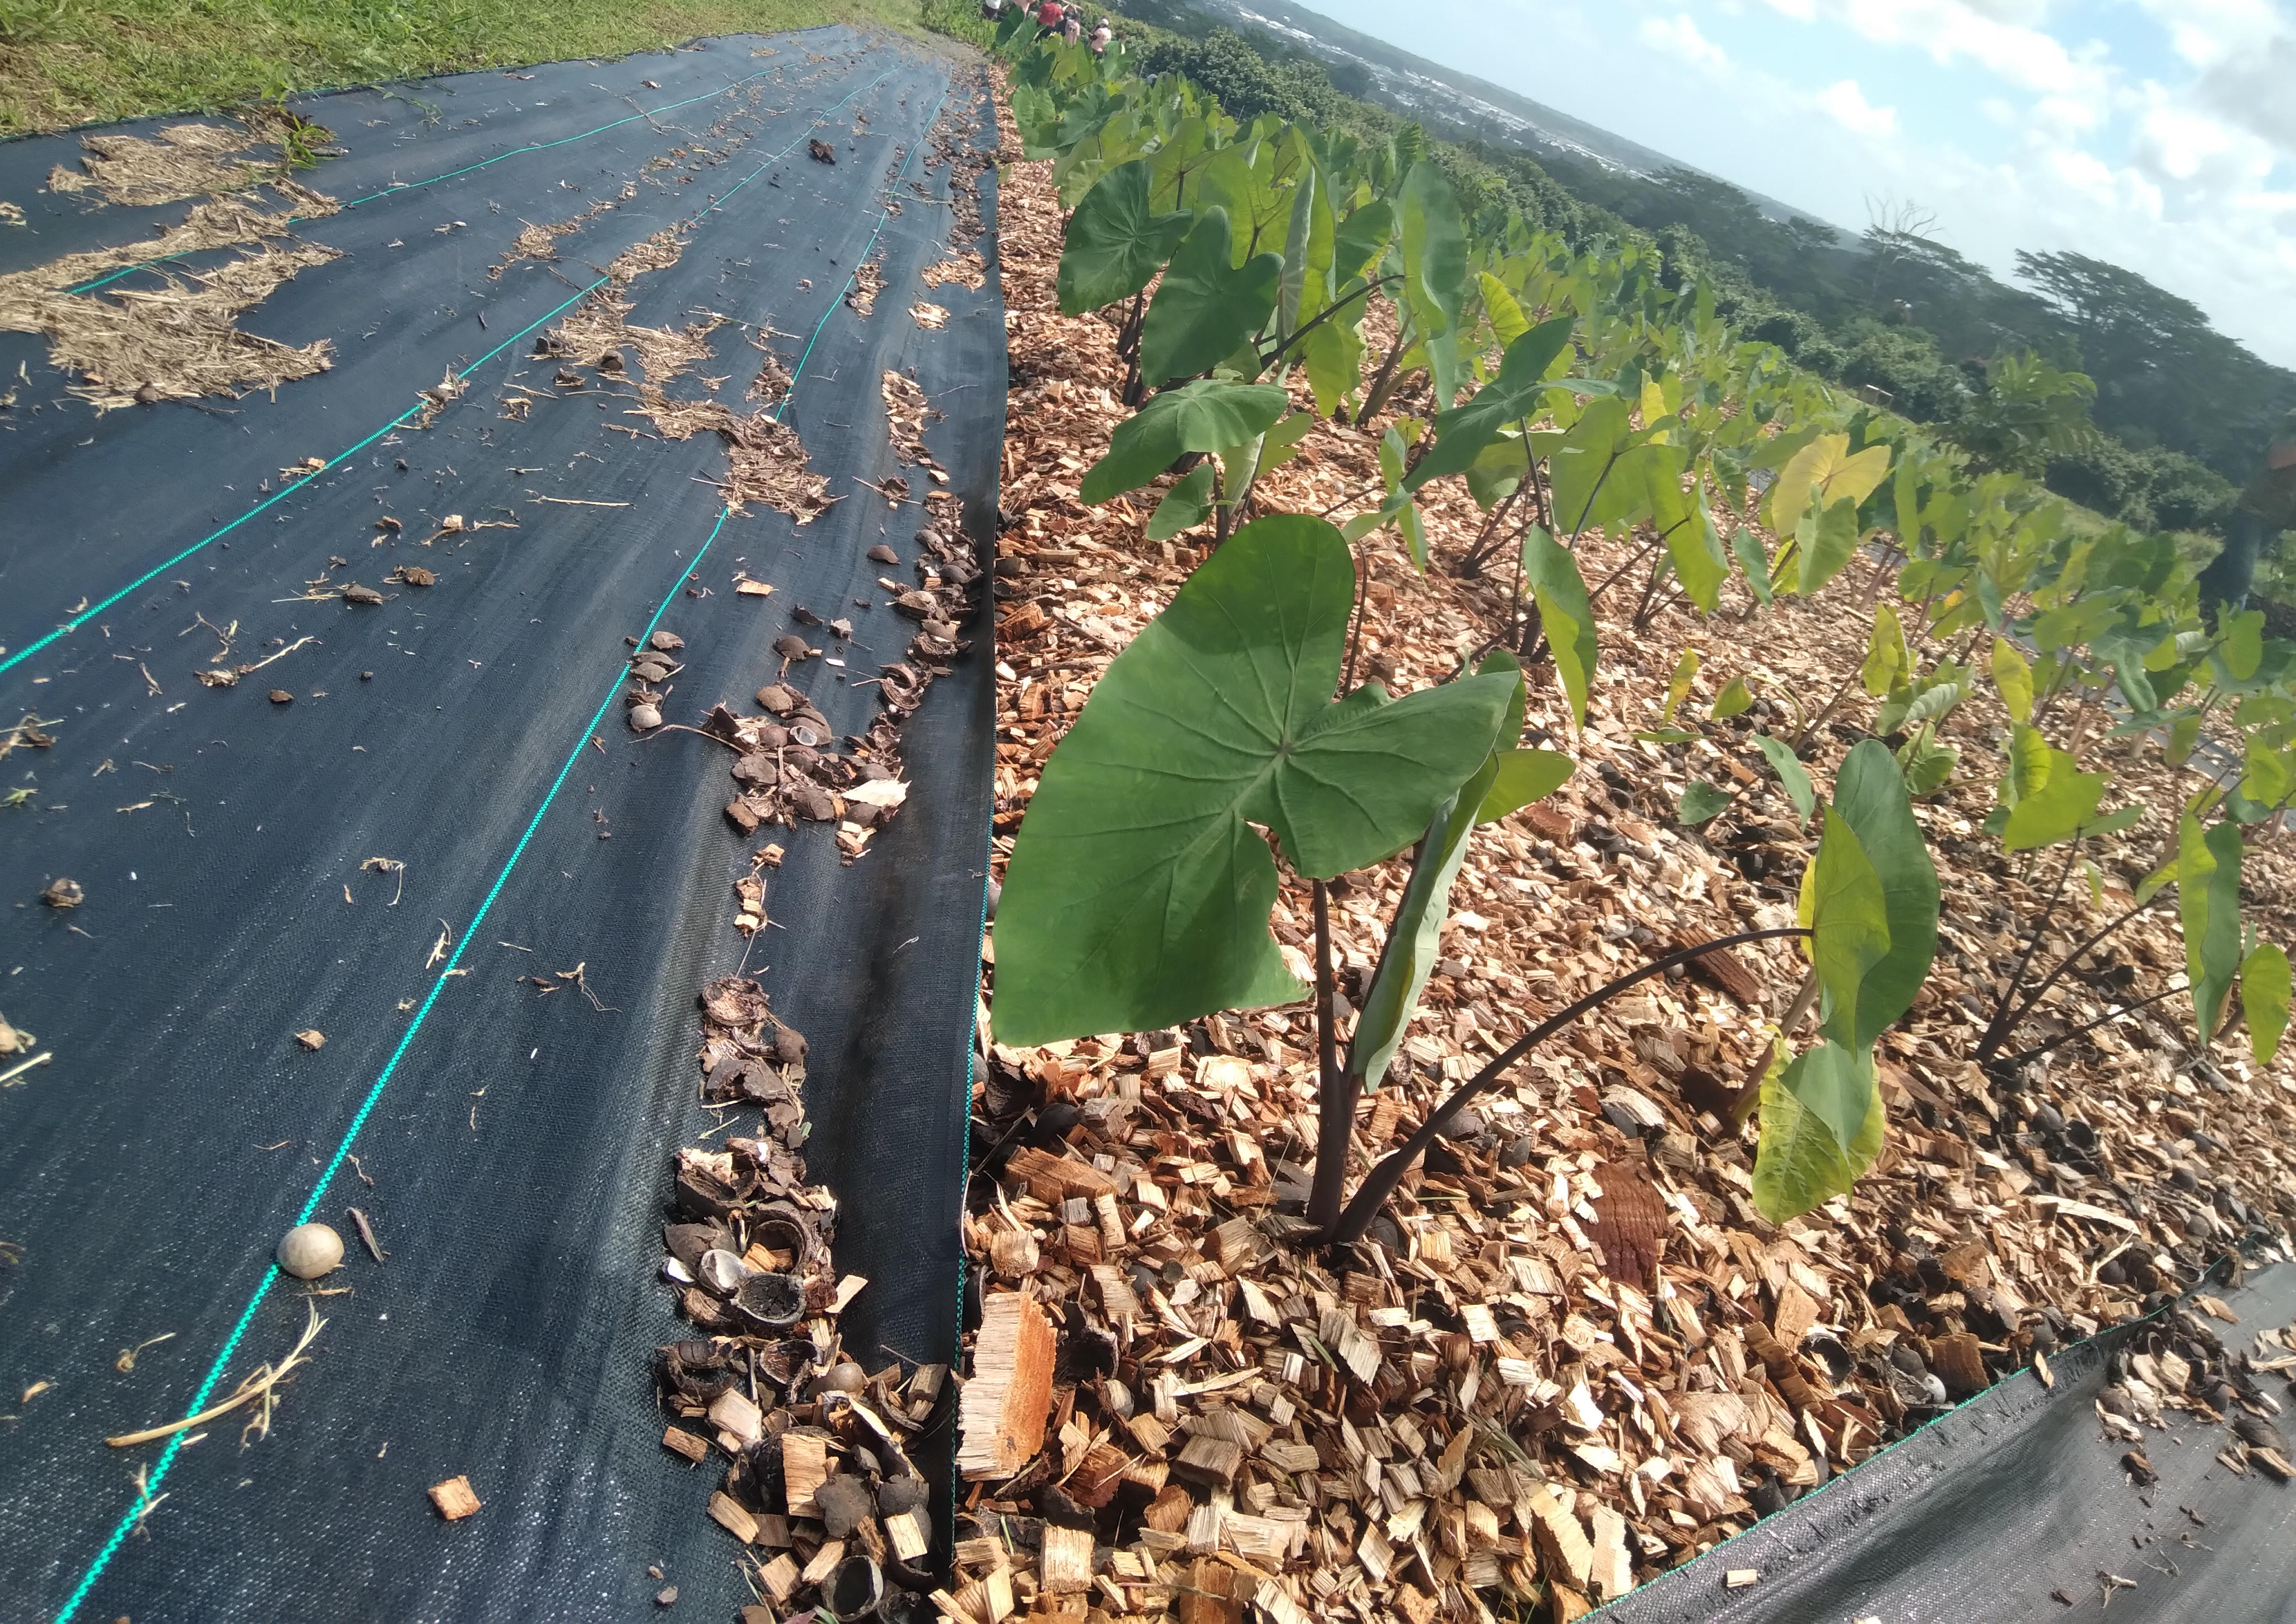
Upland (also called dryland) farming is the ‘garden-style’ way of planting kalo, and it is the method most often employed by farmers outside of Waipiʻo and Hanalei. The huli – a leaf stock with part of the corm, or root, still attached – are planted into mounds of soil in mālaʻai (gardens or farms) and rely on rainfall and mulching to grow. “Dryland” is a bit of a misnomer, since kalo still requires rain and moist soils to produce healthy corms. This method takes about 8-12 months to produce harvestable kalo, and it produces lots of healthy leaves that can be used to make laulau and luau. Upland taro corm is usually prepared steamed or baked and sliced into large chunks to serve.
Where to Plant
While there are methods for planting kalo in all manner of localized environments, we are going to focus here on upland planting, which can be practiced in most farmland conditions.
While there are localized techniques and practices for planting kalo in just about any environment in Hawaiʻi, upland kalo planting can be optimized by planting in thick beds of mulch or rich humus soil. Planting in low-lying areas such as the bottom of hills, slopes, and valleys will maximize the flow of water and nutrients from higher up. However, it is important to be aware of what practices are happening upland from your kalo patch; you don’t want excess fertilizers or harmful chemicals finding their way into your kalo! If you are interested in learning more about other methods of kalo planting and cultivation, you can check out Native Planters in Old Hawaii by E.S. Handy, and the University of Hawai’i’s Taro: Mauka to Makai book.

Timing the Planting Season
Kalo is a year-round plant with an 8-12 month growing season, which means that it can conceivably be planted at any time. However, it grows best when planted between April and September due to the more intense sunlight resulting in higher yields (Evans et al. 2008). Kalo also requires a considerable amount of water, and if you are in a dry area like Kona or you do not have an irrigation system available, then you should try to time your kalo planting after the second rainfall of the season. This helps to ensure that the earth is wet and that you have the best chance of the rainfall continuing long enough for the huli to establish their roots deeply enough to survive (Handy et al. 1972).
Huli Collection
Huli are prepared from the mature adult kalo plants, and every farmer and community in Hawaiʻi does it differently. If you are ever assisting another farmer in prepping their huli, always ask to see their own method first! Typically when the corms are harvested, the entire plant is pulled from the earth and the corm is cut from the bottom of the plant, leaving a few inches of corm and stem below the kōhina (the “crown” or “corm line”). The rest of the adult plant can be re-planted temporarily until it is time to harvest the huli (Handy et al. 1972; de la Peña 1998; Evans et al. 2008).

Big, healthy huli tend to yield bigger corms of kalo, and some farmers opt to collect huli by harvesting a few entire plants at their peak height before the corm has fully developed; this sacrifice provides the large, healthy huli that can then be planted in the next field (Evans et al. 2008). Other farmers prefer to replant the kalo after harvesting the corm until they are ready to collect and replant the huli (John Caverly 2022, personal communication). To prepare the huli, the harvester should cut along the kōhina with a sharp knife. Leaving too much of the stem below the kōhina can result in corm rot, drawing in worms or stunting the growth of the huli. Cutting above the kōhina will not leave enough of a base to keep the huli hydrated and fed, and the huli may dry out, fail to take root, or develop root rot. (Handy et al. 1972; Evans et al. 2008)
The harvester should then cut the leaves and stems back just ¼ – ½ inch above where the youngest leaves at the center of the stem will emerge next; this will allow the huli to develop its new leaves without using excess energy. Be careful not to leave thick, older stems or flowers attached to the huli, as this will slow the growth of the young plants.
Check out this video for a detailed example of how to harvest and plant huli!

Huli Planting
Before a kalo patch is planted, the soil should first be tilled and rested for at least two weeks. John Caverly of Sweet Cane Farm swears by the spading machine, which serves the role of tilling with the added benefit of protecting the soil microbes by not exposing them to direct sunlight. Once the soil is rested, any stones and large chunks of plant matter like roots should be removed. After the soil has rested and is fairly dry but still moist enough to work with, it is ready to be planted (Evans et al. 2008).
Dig your holes about 9 inches deep and 9-12 inches across; there should be between 1 and 2 feet between each hole. The distance between holes varies between farmers, the amount of planting material available, and the variety of kalo being grown. More space between huli will yield larger corms, and more distance will yield more ʻohā for future planting (Evans et al. 2008). Too much space between huli will make it difficult for the kalo to fill out their canopy and shade out weeds, making more work for the farmer.
For mechanized commercial dryland kalo farms, rows are typically planted 4-5 feet apart depending on the equipment available, and individual huli are planted 1 to 2 feet apart. Wider spacing improves aeration and decreases the risk of phytophthora spread, but shorter spacing improves weed suppression (Evans et al. 2008). Non-mechanized commercial dryland kalo farms, rows are typically planted 2-3 feet apart; the same benefits and risks of distance apply as they do for mechanized dryland kalo. John Caverlyʻs non-mechanized kalo patches use 2 feet spacing between each hole to allow them to spread out and fill in naturally, and about 3 feet between rows.

Once you’ve dug your holes, mix a handful of your amendments into the soil at the bottom, stirring it up before planting. When you plant your huli, place them into the holes and press the kōhina firmly into the earth with your entire body weight. You should be able to gently tap the top of the huli without it falling over; this is a sign that the huli will be able to withstand the wind (John Caverly 2022, Personal Communication). Many kalo farmers do not fill in the puka (holes, or navels), choosing instead to let the huli take root and pool water naturally until wind and weather slowly fills them in. Others will wait about one month for the kalo to establish before filling in the holes. In areas of low rainfall and harsh sun, however, placing more soil or mulch over the base of the huli after planting can help prevent drying and desiccation (Handy et al. 1972).

Depicting the life cycle of kalo. Copied from The University of Queensland’s Taro Project website
Fertilizing and Maintaining your Kalo
As with all crops, kalo requires certain nutrients to thrive, including nitrogen, phosphorus, and potassium (NPK). Whenever you plant a crop, it is wise to first test your soil for nutrients so that you can tailor your amendments accordingly; fertilizer applications that are tailored to supplement the native soil nutrients result in less unnecessary nutrient runoff and less spending on fertilizer (Raju & Byju 2019).
When it comes to selecting fertilizers and soil amendments, there are a considerable number of both conventional and organic options. John Caverly’s organic amendment blend includes fish bone meal, spirulina powder, and bioflora granules. Troy Keolanui at OK Farms uses a conventional/organic blend that includes gypsum, 0-45-0 NPK, dolomite, organic Bioflora granules, and fishbone meal. A more general NPK approach for home gardens suggested by CTAHR is a 7-30-20 or 10-20-20 NPK, although they also suggest obtaining a soil test first to better target your amendment blend based on your soil needs (de la Peña 1998).
Amendments can be blended in batches and then mixed into your planting holes as described in the previous section, Huli Planting. Cover crops like sunn hemp and sorghum-sudan grass hybrid can be grown for 4-6 weeks before being cut and worked into the soil, providing additional organic matter and nutrients as it decays over the next 2-4 weeks (Evans et al. 2008).
Curious how to tell if your kalo is showing symptoms of nutrient deficiency? Check out page 2 for a handy diagnostic flow chart to help figure out what might be wrong with your kalo, and learn more from this Nutrient Deficiencies and Excesses in Taro CTAHR document!

Weed Control
Upland kalo are susceptible to weed competition during the first 3-4 months of growth before their leaf canopies become established (de la Peña 1998). While hand weeding is the most obvious and time-tested solution, there are numerous methods for controlling weeds depending on the climate, soil, and resources available to you. Some of our producers have found that laying down a 9-12 inch bed of mulch dramatically reduces the amount of weeding required. That much mulch can be cost- and supply-prohibitive, however, and lesser quantities of mulch can be supplemented with more manual weeding.

Other weed control alternatives include weed mats and plastic mulch, and the closer spacing of huli to promote more rapid canopy weed suppression. Herbicides are not recommended for the cultivation of kalo. Farmer observation suggests that kalo are very sensitive to herbicides, resulting in dramatically diminished growth or plant die-off (Handy et al. 1972; de la Peña 1998).
Harvesting Best Practices
How do I know when my kalo is ready to harvest?
When the kalo is ready to harvest, the large leaves of the kalo will begin to die down and shrink. Don’t be alarmed! This means that the kalo is directing its energy into the corm, and the kalo will soon be ready to harvest. Check out diagram above for a kalo plant’s life cycle to see a visual representation of this phenomena.
How to Harvest
To harvest your corms, grip the kalo near the base of the stem, pull upward, and twist gently until the corm lifts from the earth. Then cut the corm from the bottom of the plant, leaving a few inches of corm and stem below the kōhina. These kalo can then be placed back into their holes until you are ready to harvest the huli.

Pests
The Taro Root Aphid is the greatest threat to dryland kalo. Other, less threatening insects to keep an eye out for include leaf aphids, planthoppers, mites, whiteflies, and mealybugs.
Prevention of the spread of aphids is crucial to protect your crops. Rotating your field crops helps prevent ongoing infestation, and it is recommended that you wait at least 1 year between kalo plantings in a given field.
CTAHR researchers have developed a method for disinfest field-harvested huli, which you can learn about here (PDF).

Diseases
To prevent the spread of kalo diseases, be sure never to plant huli that present any sort of basal rot. Diseased corm and root material should be removed from the kalo patch during harvesting and disposed of (Parris 1941; Evans et al. 2008). This ensures that no kalo is left behind to feed more disease in the soil. To treat your soil before you plant, plow it and allow it to dry in the sun. Crop rotation is also recommended; planting another crop on that land will give the disease time to die off without its kalo host. There are certain varieties of kalo that are disease resistant, which can add an extra layer of protection to your plantings (Parris, 1941)
Commercial fungicides are available for managing both Pythium and Phytophthora in upland kalo fields. A detailed breakdown of pesticides approved for use in kalo in Hawaiʻi can be found here.
Click here to learn more about Taro Leaf Blight (TLB, aka Phytophthora blight), and potential treatments in this publication by CTAHR.
Click here to learn more about Pythium root and corm rot (Pythium spp.)
References & Sources Cited
Anthony D. (n.d.). How we plant huli here on the farm school. Youtube. Available from https://www.youtube.com/watch?v=r-TphOSmBMg&t=125s (accessed July 5, 2022).
Cho JJ, Yamakawa RA, Hollyer J. 2007. Hawaiian Kalo, Past and Future:8.
de la Peña RS. 1998, October. Upland Taro. CTAHR.
Evans D, Uchida J, Levin P, Miyasaka S, Teves G, Hollyer J, Nelson S, Ooka J. 2008. Taro: Mauka to Makai, 2nd edition. College of Tropical Agriculture and Human Resources, University of Hawaiʻi at Manoa.
Handy ESC, Handy EG, Kawena Pukui M. 1972. Native Planters in Old Hawaii: Their Life, Lore, and Environment, 2nd edition. Bernice P. Bishop Museum.
Kagawa-Viviani A, Levin P, Johnston E, Ooka J, Baker J, Kantar M, Lincoln NK. 2018. I Ke Ēwe ʻĀina o Ke Kupuna: Hawaiian Ancestral Crops in Perspective. Sustainability 10:4607. Multidisciplinary Digital Publishing Institute.
Lincoln NK. 2020. Agroforestry form and ecological adaptation in ancient Hawai’i: Extent of the pākukui swidden system of Hāmākua, Hawai’i Island. Agricultural Systems 181:102808.
Miyasaka SC, Hamasaki RT. 2002. Nutrient Deficiencies and Excesses in Taro. UH CTAHR Cooperative Extension Service:14.
Nelson S, Brooks F, Teves G. 2011. Taro Leaf Blight in Hawai‘i:14.
Parris GK. 1941, May. Diseases of Taro in Hawaii and their control. University of Hawai’i Agricultural Experiment Station.
Raju J, Byju G. 2019. Quantitative determination of NPK uptake requirements of taro ( Colocasia esculenta (L.) Schott). Journal of Plant Nutrition 42:203–217.
Sato DM, Hara AH. 1997, December. Taro root aphid. College of Tropical Agriculture and Human Resources, University of Hawaiʻi at Manoa.
Taro and Dasheen – Pests and Diseases List. (n.d.). Available from http://www.extento.hawaii.edu/kbase/Crop/crops/taro.htm (accessed July 5, 2022).
Teves GI. 2010, October 6. Growing Dryland Taro Part I – Hawaii Agriculture. Available from https://hawaii-agriculture.com/growing-dryland-taro-part-i/ (accessed October 29, 2022).
Teves GI. 2013, July. Special Kalo Edition: Molokai Native Hawaiian Beginning Farmer Program Newsletter. UH CTAHR Cooperative Extension Service.
Teves GI. 2015, July. Growing Upland Taro. Molokai Native Hawaiian Beginning Farmer Quarterly.
Trujillo EE, Menezes TD, Cavaletto CG, Shimabuku R, Fukuda SK. 2002. Promising new taro cultivars with resistance to taro leaf blight: “Pa’lehua”, “Pa’akala”, and “Pauakea”:4.
Whitney LD, Bowers FAI, Takahashi M. 2007. Taro Varieties in Hawaii. Hawaii Agricultural Experiment Station, University of Hawaii.